I wanted to try something new with my next model so decided to create an iron gate supported by stone pillars, enabling me to try out the soldering technique. Firstly I started by creating the stone pillars using foam board, polystyrene and air drying clay.
Sunday, 29 June 2014
Sunday, 15 June 2014
Rabbit Hut
With this model I wanted to create a quick little prop, so I decided to create a Rabbit Hut taking a few days to complete. I made this prop out of balsa wood, sand paper, wire mesh and fimo. Below are some pictures of the how I made it:
Firstly I cut all the components to size and glued together. For the roof I wrapped it in a sheet of sand paper to give the impression of a felt roof used on garden sheds.
I then started to add a bit of colour using acrylic paints to get a base colour, then used chalks to make it look dirty/well used. For the roof I painted the sand paper a grey/black colour, added some light grey chalk for dust and grime, painted in some rust running slightly from the nails and finally added some green moss stuff to exaggerate the fact its an old hut kept outside.
I also made a little food bowl, with oaty food, straw and droppings, to make it look used.
Finished turnaround of the Rabbit Hut:
Saturday, 2 March 2013
Animate Exeter Model Making Workshop
A few weeks ago I applied to take part in a model making workshop at animated Exeter, for which I was delighted to hear I was successful. This course was run by a lovely lady called Gill Bliss, who is a model maker at Aardman. With her experience and enthusiasm about model making I gained a lot from this course and feel her enthusiasm has rubbed off on me and made me even more determined to improve my modelling skills and become a successful model maker within the animation industry.
During this course we completed the following activities:
Day 1
Research + Character Design
![]() | ||
| Moodboard |
![]() |
| Rough Sketches |
![]() |
| Character Turnaround |
When Gill said we were starting by designing a character I was a bit worried as I'm useless at creating a character in my head and than drawing it on paper. However I got right into it and was able to create the designs above, which surprised me. I think being forced to create a character in such a short time worked well. However struggled to draw the front view of the croc's designs due to the long nose, when I attempted it he looked like a pig.
Sculpting the Croc's Head
1. I started by creating the basic shape of the Croc's head using tin foil on a wooden stick.
![]() |
| Tin Foil Base Shape of Head |
2. I then started to apply the plasticine, building it up slowly and adding key features such as eyes, nose and lip line. For the eyes I used beads, which I placed in the correct place quite early on in the process so I could then build up the plasticine around them; making them appear as if they are sitting within eye sockets.
![]() |
| Basic Features sculpted out of Plasticine |
3. I then started to add more details such as spikes on the back of his head.
![]() |
| Adding Spikes to Back of Head |
4. I then decided I wanted the croc to be holding a fish in its mouth, so I removed the bottom lip to enable me to model it slightly open so the fish model (which can be seen below) would fit in and look as if he is actually holding it there.
![]() |
| Removing Bottom Lip |
![]() |
| Dead Fish Model |
5. Once I was happy with the fish model I placed it within the croc's mouth and made it look limp and lifeless.
![]() |
| Croc Holding Fish |
6. The finishing touch was the teeth, which I think really brings this character to life. For the process of adding the teeth I firstly made little teeth holes and forced the lip out slightly so that once the tooth was in place it would look as if it is part of the mouth. Also from my research the areas around the teeth were very dominant, going in and out around each individual tooth.
![]() |
| Adding Teeth |
The Finished Model
I am really pleased with how this came out and enjoyed sculpting using plasticine as there is no worry of it drying out and hardening unlike clay. I think a scaly texture should be added in places, such as on the top and underneath of the nose and down the back of his head just to finish it off. I also think I should added a bit more character to his eyebrows as he appears to be staring a bit making him look a bit lifeless, these would also show more of his characteristics to the viewer.
Monday, 25 February 2013
Shaun the Sheeeeep!
Last week I visited the Eden Project to take part in a model making session run by two model makers from Aardman. We modelled Shaun the Sheep, which was great fun!! It was nice to see how much animations such as Shaun the Sheep entertain kids as they were all thoroughly enjoying themselves.
Even though I was the oldest there I am pleased I went as I met two really nice people from Aardman, who gave me some interesting tips about model making.
Saturday, 9 February 2013
Kids Tricycle and Cart Model - Final Photos
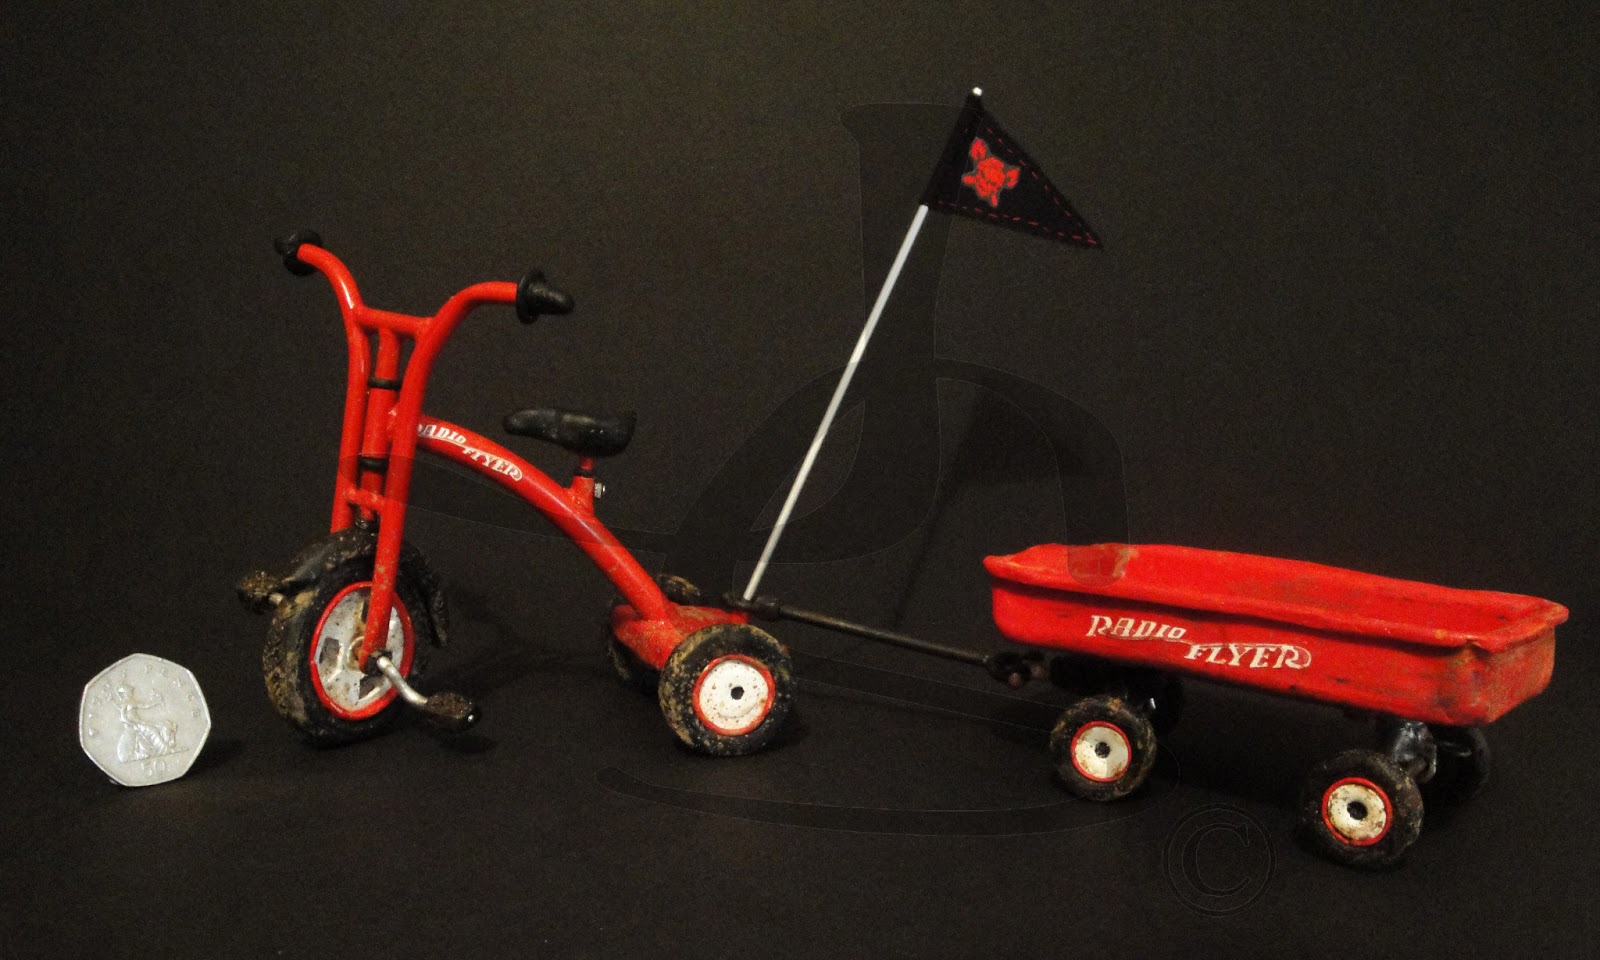
I am very pleased with how this model turned out and I have thoroughly enjoyed, designing, planning and constructing it. I made it in mind of it being a little terrors tricycle who loved going on adventures and causing trouble. With this in mind I believe I achieved the perfect tricycle for this character due to arrange of factors:
- The most obvious one being its muddy appearance, the combination of paint and mud worked really well adding a sense of realism to it and making it look as if it has been on an adventure through the woods.
- I like the scratches, scraps and dents I incorporated into the design, especially with the cart, illustrating further that it is a well used item.
- I am pleased I re-designed the Tricycles handle bars as it just makes it look sturdier therefore more suitable for a lively little trouble of a boy. This is the same for the front wheel pivoting design I added to the cart as its more suitable for being pulled along making it easier to turn corners faster without tipping.
![]() |
| Front Views |
![]() |
| Side Views |
![]() |
| Back Views |
![]() |
| Scale of Tricycle and Cart in relation to a 50p |
Things I would alter/add to it:
- I think I could make the
tricycle a bit more used looking e.g. more worn areas and scratches to
fit a bit better with the cart.
- It could be made more individual to its owner, such as adding stickers etc.
- I would also like to make a little helmet and contents for in the cart, just to finish it off.
I
have learnt a lot from completing this model and am proud of the fact
that I have been able to create it with no previous experience as a
model maker, other than wood work at school and DIY with dad.
I have loved creating this model and can't wait to start my next!! Keep your eye on this space for other models coming soon! =)
Cart Model - Final Photos
Cart Model - Construction
Below are some photos of how I created the Cart:
Cart Body - For this section of the cart I used fimo as I wanted to create a worn battered cart, therefore by using fimo I was able to model it then once cooked I could chip bits off etc without it cracking. To keep the walls of the cart upright while cooking I used thin aluminium sheet, which I bent and cut to the correct height. This worked really well and also enable the lip to rest upon it preventing it from sagging too. Once cooked and set I cut off the excess material, made it worn/dented and added ridges on the inside of the cart.
Wheels - I basically used the same technique as I used for the tricycle as it worked really well, however from learning that the inner sections had to be the perfect size to fit within I decide to make the wheel and inner section all one, by using a circle cutter to give a dent separating the two. This was then painted and rims added. This was definitely an easier method of creating the wheels.
Handle Mechanism -For the handle pole I used a 0.3mm aluminium rod, which I attached to the same type of rod bent into a 'u' shape. Both of the edges of the 'u' were then attached to two separate 0.5mm aluminium tubing; these tubes will rotate upon a 0.3mm aluminium rod and held in place by fimo washers that don't prevent it from rotating. A 0.5mm piece of tubing is attached to the non-rotating 0.3 rod and the main twisting component . As this handle will be used to turn the front wheel section I added milliput to strengthen the join.
Handle - This was made from fimo with a large enough hole in the middle for it to fit over a 0.5mm tube (flag support pole on the back of the tricycle)
Underneath Supports -The main pivot point for the front section is a 0.8mm aluminium rod, which is firmly attached to the underside of the cart. On this is the large black section made from fimo that is the main component that rotates upon the fixed rod, to prevent this from working its way off the rod, I made a fimo washer keeping it on.
Attached to this black component are the two arches for which the wheel pivot pole will be fed through and allowed to rotate. For these I securely fitted them into a vice and hammered the ends over until they were at the right angle, then hammered the ends flat to get a big enough area to drill a hole through.
Once I had made all the parts and little components I laid them out in an exploded diagram view to make sure I had everything and to help me plan the order of which I was going to assemble everything together.
Attached to this black component are the two arches for which the wheel pivot pole will be fed through and allowed to rotate. For these I securely fitted them into a vice and hammered the ends over until they were at the right angle, then hammered the ends flat to get a big enough area to drill a hole through.
Once I had made all the parts and little components I laid them out in an exploded diagram view to make sure I had everything and to help me plan the order of which I was going to assemble everything together.
Once all the underneath parts had been assembled I check to see that everything worked as it should e.g. front wheel section rotated, wheels rotated freely and the handle pivoted up and down. Thankfully everything worked properly.
Adding More Support -After seeing everything together I saw a problem straight away; with only the middle beam attached to the cart body, the body would be unsteady. If this was a real cart and heavy items were place on one side the cart body would lean over and probably break. To fix this I added to the design some cross beams to add more support; this can be seen below:
For these beams I used 0.7mm aluminium tubing hammered gently so one side was flat (which would be attached to the underneath of cart body) both ends were flat and in the middle where it meats the middle beam so it is a flat surface for the cart body to be attached to, as can be seen below:
Finishing Touches - To show how the wheel section was attached to the cart body I added nuts and bolts on the cross beams underneath and nails in the cart. The entire cart was then made dirty with paint and mud, with added rust where the nails were just to make it more realistic and to fit in with the tricycles appearance. I also added a little hook on the back for items to be tied to it.
Subscribe to:
Posts (Atom)